
Growing and propagating echeverias is incredibly easy and addictive! This hardy, colorful plant is one the most beloved and oft-cultivated species of succulents in the world. Start with just one, and you can quickly end up with a whole collection.
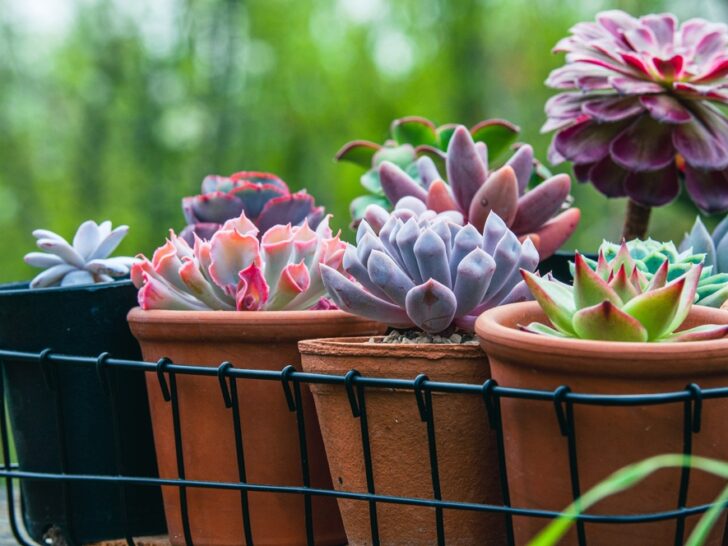
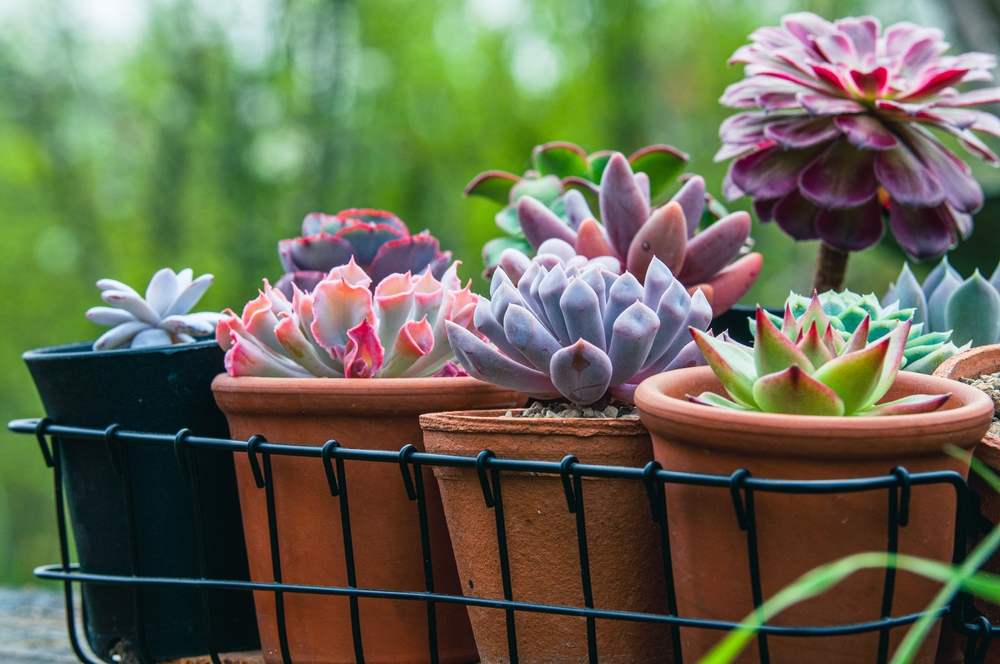
Echeverias is a group of very hardy succulents that grow in colorful rosettes. They can be almost any hue, and their leaves come in various shapes and textures. They thrive on neglect, produce beautiful, lasting flowers, and can be propagated from cuttings, offshoots, or seeds.
This article will explore the care and propagation of echeverias in depth. I will detail this plant’s light, soil, water, temperature, potting, and fertilizing needs and offer tips on each of the three propagation modes.
Growing Echeverias
It’s not an exaggeration to say that echeverias are the easiest succulent to grow. I stumbled into echeverias cultivation with only cursory knowledge of succulent care. I made many mistakes with the first plant I bought.
In fact, I potted it in the wrong soil, used a much too-large pot, and then overwatered it several times. Before long, it looked miserable, and the leaves fell from the stems at the slightest touch.
In fact, I thought I had killed it! I left the remains in a quiet corner of my yard for a year without even looking at them. Then one day, I noticed–my echeverias had come completely back to life!
This is why you hear people say echeverias “thrive on neglect.”
Water
The cardinal rule in succulent care is do not overwater. Unfortunately, it’s all too easy to do!
Echeverias are desert plants native to Mexico and South America. In nature, they go long periods without rain and then receive a sudden abundance of it. That’s just how they like to be watered.
How often you should water your echeverias depends on several factors. Those include sunlight, temperature, soil, pot size and drainage, airflow and humidity, and time of year.
For the best results, you should water your echeverias when the soil is dry rather than on a timed schedule. To know when it’s time to water, you need to know how to check the soil for moisture.
When you do water, you water deeply. Give your succulent that desert deluge. Soak the soil from top to bottom and then let it drain thoroughly. You only need to water your echeverias in winter if you live somewhere with very warm winters.
How To Check Soil for Moisture
There are several ways to do this. I recommend the finger test method. It costs you nothing, and it’s the most reliable!
Poke your finger in the soil up to your second knuckle. If the soil is wet, it will feel cold, and clumps of dirt will stick to your finger when you pull it out.
If the soil is dry, it will feel cool or neutral, and your finger will come out clean or dusted faintly with dirt. Only water when your finger comes out totally dry!
The second best method is to use a clean wooden dowel or disposable chopstick instead of your finger. It works the same way.
Light
Echeverias require a minimum of six hours of direct sunlight daily to thrive. They can’t get too much sun unless they are juvenile plants or if the temperatures are incredibly high for long periods.
If your plant starts to look leggy or lose its color, it isn’t getting enough sun! If you’re keeping it indoors, place the pot in a south-facing or west-facing window. South-facing windows get the most sunlight daily, and west-facing is a close second.
Grow Lights
Keeping succulents indoors can be a challenge if you don’t get good sunlight in your home. I know because I once lived in a house with only deeply shaded windows. I had to rely on artificial light to keep my indoor plants alive.
If you’re in a similar situation, purchase a grow light to supplement your echeverias’ needs. White, full-spectrum LED grow lights like The GHodec Grow Light for Indoor Plants (available from Amazon.com) are a great choice.
They are energy efficient, long-lasting, and don’t give off nearly as much heat as other grow lights. Just be sure to place them 12 inches (30 cm) above the plant or closer, and let them run for 8 hours a day minimum, as grow lights are much weaker than the sun.
Temperature
Echeverias require warm temperatures during the growing season but can withstand surprisingly cold temperatures during the winter.
They shouldn’t be exposed to temperatures below 50° F (10°C) for long periods or temperatures over 95°F (35°C).
If you live somewhere with extreme temperatures, keep your echeverias in pots. That way, you can bring them indoors during winter and place them somewhere shaded when it’s hot.
Soil
The proper soil for echeverias should mimic the desert soil to which they are native. That means sandy, gravel-rich, fast-draining soil. Combining succulent or cactus soil and sand, gravel, vermiculite, perlite, or other non-organic additions is best.
Aim for about a 50/50 soil-to-non-organic ratio. If you live somewhere cooler or more humid, you should up the non-organic content to improve drainage.
You can also use regular potting or garden soil, but adjust the mixture to ⅓ soil and ⅔ sand/gravel, etc., as regular potting soil holds onto moisture.
Ensuring your soil mixture drains fast will prevent your echeverias from developing problems due to overwatering.
Pots
Echeverias need pots with plenty of drainage holes. Pot without drainage holes won’t drain after watering, causing your plant to sit in soggy soil for too long. Even the fastest-draining soil will not help in this situation.
In addition, choose relatively shallow pots in proportion to the size of your plant. Echeverias have shallow root systems, so a deep pot will not be beneficial. Extra soil means more water retention and a higher risk of overwatering.
Ceramic and terracotta pots are best because they are porous. That means they remove moisture from the soil and therefore assist with drainage.
In addition, terracotta shows the soil’s water level inside the pot because it darkens when wet. You don’t need to do a finger test when you use terracotta!
Fertilizer
Echeverias can be fertilized lightly during their growing period in the spring, summer, and early fall. Use a balanced, water-soluble fertilizer like the Triple 10 All Purpose Liquid Fertilizer (available from Amazon.com). I recommend you dilute it to 50% and water only 3-4 times during the growing season. Refrain from fertilizing during the winter.
Echeverias don’t need much fertilization. Overdoing it can burn the roots and harm the plant’s ability to absorb food and water.
If your plant is very small, dilute the mix further to avoid over-fertilizing. Younger plants are even more sensitive to fertilizers.
Pests and Disease
Echevarius rarely falls prey to pests or diseases, especially if well-cared for. However, this plant’s most common problems include root rot and mealybugs. The best way to deal with these issues is to avoid them altogether!
To avoid root rot, be careful not to overwater. To avoid mealybugs, keep your plant in a well-ventilated area, don’t overcrowd it, and quarantine new plants to avoid introducing pests.
However, if you end up with either of these problems, I’ve included solutions below.
Root Rot
Root rot is a fungal infection that rots your plant’s roots so it can’t absorb water and nutrients.
Root rot can be hard to identify in its early stages. Signs include the paling of leaves, stunted growth, discoloration, and a foul smell.
A bad case of root rot is very likely to kill your plant. However, if caught early enough, here are some things you can do to save it.
- Re-pot and get rid of the old soil. The soil is infested with root rot fungus, so don’t reuse it. Just throw it away.
- Trim the infected roots off. Good roots will be pale and firm. Infected roots will look blackened, mushy, and have a foul smell.
- Sanitize the pot. You need to kill any residue of the fungus. Isopropyl alcohol will do the job.
- Re-plant in new soil.
- Water with a 50/50 mix of hydrogen peroxide and water to kill off any remaining fungus and help get oxygen to the roots.
Mealybugs
Mealybugs are little fuzzy white insects that suck the sap from succulents. They inject your plant with a toxin as they feed. It causes discoloration and malformation of leaves. A bad infestation can slow or stop your plant’s growth.
If you see mealybugs on your plant, quarantine it immediately, as the mealybugs will spread to other plants. Treat the infestation by spraying the plant with 70% isopropyl alcohol, being careful not to soak the soil.
If that doesn’t work, try insecticidal soap:
- Mix 1 tbsp (15 ml) of dish soap in a spray bottle with 1 qt (0.95 L) of water.
- Spray any bugs you can see.
Neem oil spray and other oil-based insecticides are also good choices. You can get them at your local garden supply store or order something like Harris Neem Oil Cold Pressed Water Soluble Concentrate (Available from Amazon.com).
Finally, there are also many chemical insecticides available. Still, they can be harsh to your plant and toxic to pets and people.
Propagating Echeverias
Propagating echeverias might be the most fun thing about cultivating this plant. It’s so easy you can, and probably will do it by accident! All you need is cactus soil, water, sunlight, and a single healthy cutting.
Below you will find detailed, step-by-step instructions for each propagation method. However, you can also check out this youtube video tutorial Propagating Succulents by Plant One on Me, for helpful visual instructions:
Propagate by Cutting
Leaf Propagation
This is the easiest way to propagate your echeverias. Gently pull off a few healthy leaves from a healthy plant. Choose plump leaves with no damage or discoloration, and remove them from the base of the leaf.
Set the leaves somewhere outside that is shaded to callous over. They will need 3-7 days for the wounds where they separated from the mother plant to harden and heal up. If you skip this part, your leaves will rot before they can root.
Once the leaves are calloused, prepare a small pot with fresh cactus soil. Dampen the soil with water but do not soak it. You can then poke the end of the leaf ends into the soil a little bit or just lay them on top with the calloused ends touching the soil.
Place the pot somewhere warm but shaded, as direct sunlight will burn your echeverias sprouts.
Usually, the cuttings will begin to grow roots in about 2 weeks. After a few more weeks, the original leaf will fall off. Your echeverias pup is ready to be repotted in a fast-draining soil mixture as described above.
Stem Propagation
This method is often used when a plant gets leggy and no longer looks attractive. Using a clean, sharp knife, cut the head of the rosette off at its base. You can remove some of the leaves from the head during this process and propagate those too.
Set the head somewhere shaded to callous. It may take longer than 3-7 days because of the larger wound. When the callus has formed, replant the head in another pot with fresh soil. It will begin to root after a couple weeks.
In addition, new pups will form on the stump of the original plant! These can be allowed to grow or can be removed and rooted elsewhere.
Propagate by Offshoot
This method is less common, as only mature echeverias grown in ideal conditions will produce pups (baby plants). You may not want to wait for that occurrence! However, when it does happen, propagation is simple.
Pups will sprout from the base of the mother plant. To remove them, gently pull away from the base of the stem. You may need to remove the mother plant from her pot for easy access.
The pups should break away from the mother plant easily. In addition, they should already have some root development!
Now you can pop them into a new pot with fresh soil mixture and place them someplace with partial shade to develop further.
Propagate by Seed
This is the most intensive and least popular way to sprout echeverias. However, suppose you have multiple flowering specimens. You can cross-pollinate them and make your own cultivar (variety) of this plant!
To ensure that cross-pollination happens, you can transfer pollen from one plant to another with a paintbrush or q-tip. Or you can set the flowering plants next to each other and let nature do the work.
Either way, when the flowers eventually die and fall off, collect the seed pods from inside. Then prepare a shallow container with drainage holes and fill it with cactus soil.
Spread the seeds across the soil’s surface, moisten them thoroughly with a spray bottle, and cover them with cellophane or a plastic bag.
Set the pot somewhere warm but shaded, and keep a close eye on it. Moisten the soil when it dries. You should have sprouts in a couple weeks!
Conclusion
Echeverias is a perfect succulent to cultivate for beginners and experts alike. So long as you give it fast-draining soil, a good pot, plenty of sun, and don’t overwater it, this plant will flourish. In addition, it’s incredibly easy to propagate by cuttings, pups, or seeds.
With its hardy nature and endless variations in color, shape, and texture, echeverias might be the most beloved succulent of all time!
Other Articles You May Also Be Interested In
Echeveria Agavoides Care and Propagation